Posts tagged time
Ravensbourne 2012
Ravensbourne 2012 is the end of year show run solely by students to show case students work to their respective industries. As for 3D Storytelling my role is as head of rigging and logistics. This has involved working a lot closer to the directors of the event rather than working within the engineering group.
The main task that I have faced with Ravensbourne 2012 has been lighting for the 4th floor. Originally fashion wanted to put there show on level 7 but this would have made lighting it physically impossible due to the height of the ceiling and logistically it wouldn’t be possible to have the number of people that they wanted in that space. Russell and myself talked them round to holding the show on the 4th floor which is a much better space to work in but still has many challenges first of which was designing a light weight structure that was strong enough to take more lights than we had last year. Due to the weight restrictions on the floor I had to put an extra 4 ground supports in to spread the load over the floor. Overall the maximum load that I can put onto the floor is 4 tons but I can’t have more than 500KG at any one point. This has definitely been my biggest engineering challenge this year, if we had been allowed to fly the structure off the RSJ’s on the ceiling above the 4th floor I would have never faced this issue and the space would look a lot cleaner than its going to, but we all have to make compromises.
Working so closely with the management team has posed its own issues as Russell and myself have been rather segregated from the engineering team and been in the level 1 office most of the time, this is something that we had to do however as the event would not run without us. The hours that we have put into this has been tremendous, planning almost everything and trying to fix all of the logistical/engineering problems and picking up the slack when needed. I have also had a couple of run in’s with the management team on some of their decisions, the main one being over stage electric. After 3D Storytelling I did some deals with stage electrics for Ravesbourne 2012 with the managing director of Ravensbourne 2012 but the rest of the management team did not agree and felt that we could get a better deal elsewhere. This was not true as the kit they were asking for from other companies was not what I had specified for the rig. Eventually a very last minute decision was made to go with my original plan, as it was the best deal on the table.
3D Storytelling 2012
3D Storytelling is one of the biggest events of the year at Ravensbourne. The event is totally different from any other that is run within Ravensbourne as it is headed up by the events team and is run by a select group of students. This year Russell Fleming and Myself took on all of the events logistics and rigging with Tom Glover creating the lighting design. The event features around the fact that there is a RealD Projector in the walker space that allows speakers from different companies to show off there work to the rest of the 3D television and film industry. This gives the students a platform to network with people form within industry as nearly 1000 delegates turn up across the 2 day event.
My role for 3D storytelling was as head of rigging and logistics, Russell was head of event technology and logistics, both of us have these roles for Ravensbourne 2012. The main rigging requirements for this event were to light the walker space for the keynote speeches, light the building to give it a different look and feel and put power distribution on the 4th floor for the exhibition.
To start with I worked out the power requirements for the exhibition going off a floor plan with 22 stalls on it. This time I decided to use the 125 Amp 3Phase on level 5 and split it down to 2 63 Amp 3Phase’s as we had some high power lights for the architectural lighting. The distro’s that we went with were 125A 3P to 2 x 63A 3P and 2 x 63A 3P to 18 x 16A. This meant that I had more than enough outputs for all of the lighting requirements and if all of the stalls were used. We also made the decision to cut the 4 way extensions down to 2 as it was felt that they only need 2 sockets per stall.
For the lighting side of the rigging Tom had asked for 4 city colour washes to go on level 7 and 4 to go on level 4 along with 2 Clay Paky 1200 spots to go at each location. The Clay Paky’s on level 7 had to be hung to get good coverage on the wall. Originally I wanted to hang them off a truss rigged to the RSJ’s above level 9 but as we did not have a load testing certificate to say what load they could take health and safety did not like the idea. I then decided to put them on 2 wind up stands on the 7th floor. The lighting for the main atrium was originally going to go on the 4th floor but was deemed to be in the fire lane and had to be moved when once it had been put in place. We had to move it to the 1st floor/Mezz which actually created some nicer angles and gave a really nice look on the final night when the networking was taking place in the welcome space. All of these lights were sitting on 3ft high deck so that the metal grill under the railing did not get in the way.
In the walker space we felt that we had to do something different from what had been done before in that space. We ended up dead hanging a scaff bar and putting par cans up for a wash of colour along with source 4’s with gobo break ups in them, for once no movers were used. This all ran of the house dimmer pack saving a lot of money and time.
The biggest challenge that Russell and myself had in the planning stage of this event was where to put a Telegenic OB truck. This is a major problem as the outside of Ravensbourne is not designed to have a truck of this size sitting there for over 2 days. This caused major problems right up until the last minute as every location that we chose there was something causing a problem. In the end we got parked it down the side of Rave. I feel proud at the amount of contacts that Russell and myself made out of this event, some of which involved people that generally students don’t even know about. I also made sure that I did not make the same mistakes that I made at penrose market. The logistics generally ran very smoothly with no major problems. This is due to the time and care that Russell and myself put in and the communication with the management of the event. I have to give a big thank you to the second rigging team as they managed to gel over 250 florescent lights around Rave to change the colour of the building.
Penrose Market 2011
For Penrose Market I was allocated the job role of head rigger. The tasks that I was to undertake in this role was to come up with a power plan for both the market on the ground floor and on level 4 of Ravensbourne. The reasoning behind doing this, even though there is already plenty of power in the floor boxes, is to make sure that there are enough power sockets for each stall and to give us greater control over the power that is being used on each phase of electricity.
When I was given the original list of the power requirements from Russell I nearly jumped out of my skin, as there was 103 stalls that required power across both the ground and 4th floor. This was going to be the biggest power distribution system I have every designed. To start with I need to work out what power was required on which floor, this meant going through all of the original requirements that Russell had put together and working out where each stall was placed on the floor plans. I worked out that there was 30 stalls on level 4 and 73 on level 0 requiring power. I then looked at the best distribution system for the 2 locations and made the choice to use the 63 Amp 3 phase on level 7 to power level 4 and the 125 Amp 3 phase that is in the OB point out the back of the walker space to power level 0.
My original concept for level 4 was to have a short cable going from the socket to the distro and then use soca to run the distance down the side of the balcony to the stalls on the 4th floor. In the end I decided against this as it was going to massively increase the cost of soca and getting a longer length of 63 amp cable was working out much cheaper. This also meant less mess of cables on the 4th floor and a quicker rig time, as we only had to drop 1 cable over the balcony from level 7 to 4. Level 0 kept to the original design as I had to run at least 10M of 125 Amp 3 phase cable from the OB just to get to the back door of the walker space.
The distro that I decided to go with for the 4th floor was 63A 3Phase to 18 x 13A/15A and 16A sockets. This was chosen as each output of 13A/15A/16A all have a 16A RCOB protecting the users. As I had decided to put the distro on the 4th floor, it was not really necessary to use soca as the distances were short. This meant just running 16A out to each location with a 4 way extension on the end. To make up the 30 stalls I had to work out the load calculations for each stall and put the smallest power consumers on 16A splitters, most of the stalls were just running laptops or monitors in the end so the power draw is very minimal. For the walker space I chose to use a similar distro 125A 3Phase to 36 x 13A/15A/16A sockets. This also has 16A RCOB’s protecting each group of outlets. For the longer runs out into the welcome space on level 0 I planned to use soca for this as it made life much easier to rig and de-rig. In close proximity to the distro I just planned to patch straight into the distro.
The main issue that I had during the planning stage of this event was the budget. The engineers in total only had £2500 to spend and just for power distribution I needed nearly £1500 in the end. I do feel after doing this event that I can come up with a better distribution design that will come in rather cheaper and be much less cluttered than the one that I created for Penrose.
On the actual rig day there were rather quite a lot of issues that I need to address for next time. I felt that as this was my first main event where I was the boss I should have been a bit louder and told people where to be and what to do as things were not getting done quick enough. The 4th floor should have only taken a couple of hours to rig with the amount of crew that I had, but it took most of the day. I had also made an amateur mistake in not double checking the hire quote against what I had asked for as not all of the cable that I had requested was on the quote and did not turn up. I ended up having to go to stage electrics to pick up more. I had also made the silly mistake of trying to do too much in taking on a nightshift at my part time job and running the rigging during the day. I had to leave at 8.30pm and we had barley started the ground floor power, I should have been there. This meant that the following day I was in bed resting while my team did all of the snagging. I was there for the de-rig however and that we managed to do in about an hour which was not bad going.

Penrose Market Fly Away CAD
For the Penrose Market last week we had to create a complete studio in a Rack called a Fly Away. We had to create this Fly Away because the studio facilities at Ravensbourne were in use for another shoot on the same day.
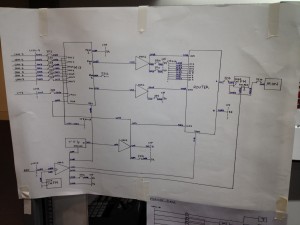
This Fly Away was created using any available kit that we found on Level 9, then using the time in our 208 and 204 lectures to design and build the system with the help of James Uren and the rest of the BET Pathway. After an initial brain storm and specification we came up with a simple system that consisted of:
- 7 SD Cameras
- 1 VT Deck
- 1 16 Channel Vision Mixer
- 1 16×1 Router
- CTP and Jack Field
- 3 Digital DA’s – 1 Analogue DA in the Fly Away
- 8 Digital DA’s – 4 Digital to Analogue Converters in the Monitor Stack
- 10 Monitors
- 1 Large Engineering Monitor
- 1 Test Pattern Genorator
- 2 Wave Form Monitors
The initial brainstorm and scribbled drawing was then drawn up, neatly, onto a large A1 sheet of paper, along with a Cable Schedule and CTP / Jack Field layouts. This large Drawing was then attached to the side of the rack and used as a reference throughout the rest of the project.
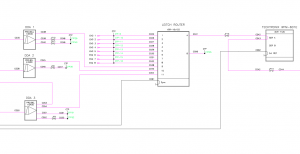 After the project was completed on Tuesday (22/11/2011) we were required as part of our Hardware Systems unit (204) to draw up a full CAD in AutoCad based on the same layers and components that were used to create the CAD’s for the main system in Ravensbourne. This exercise was designed to teach us how to use CAD to create Technical Drawings as well as be confident in reading and updating existing drawings. A screen shot of mine can be found on the right, with a PDF copy of the final cad available for download below.
The technical drawing we had to create was in fact two drawings of two separate systems which interacted closely with each other. The first was the main Fly Away, which was a single rack with all the processing and routing required, and the second was of the Monitor Stack which was required to make the Rack work. This is a major problem with the system as it require one part to work to make the rest work, whilst also doubling the amount of video connections in and out of the rack. However these problems were only noticed after the initial and were not a problem in this project as the monitor stack and rack were being built side-by-side at the same time.
Having so many connection to and from the rack also opened up another problem, which could simply be caused by confusion during the connection of the rack to the video sources and the monitor stack. This confusion could lead to video being sent the wrong way into the system, which could cause damage to equipment, or for example a Camera could be fed into one of the ENG inputs, thus it would appear to work fine on the router but it would have completely bypassed the monitor stack and more importantly the Vision Mixer.
Above I talked about just a few of the problems with last weeks Fly Away, in time I may look into re-drawing the Technical Drawing to alleviate some of the faults mentioned, and when I have re-drawn a new version of the system I will post a comparison between the two.
Download an A1 PDF of my Technical Drawing Here.
Download a PDF copy of my Cable Schedule Here.

